Pre requisites: Knowledge on Operating Systems & Containerization (Intermediate), Linux command-line usage (basic), devOps
What is a Docker? A Docker is an application which helps us in the allocation and management of containers in an effective way. The installation of Docker on Linux- distros especially Ubuntu is much convenient than on Windows because of its functionality based on the Linux-kernel. Through this blog we will explore Docker at the beginner level thereby understanding the need of its usage and how it facilitates the automation of CI/CD pipeline.
If the traditional process of developing a software is giving us no issue, then why is there a need of using Docker? Let us consider a scenario where the developers are developing an application which uses the tech-stack that is based on combination of technologies such as React.js, Node.js, Firebase, GCP, etc. Now each of these technologies might require a different environment(dev/test/prod) or library/service compatibility with the operating system. This causes difficulty in proper integration of the software application. This is where using Docker turns out to be beneficial.
Consider the image below: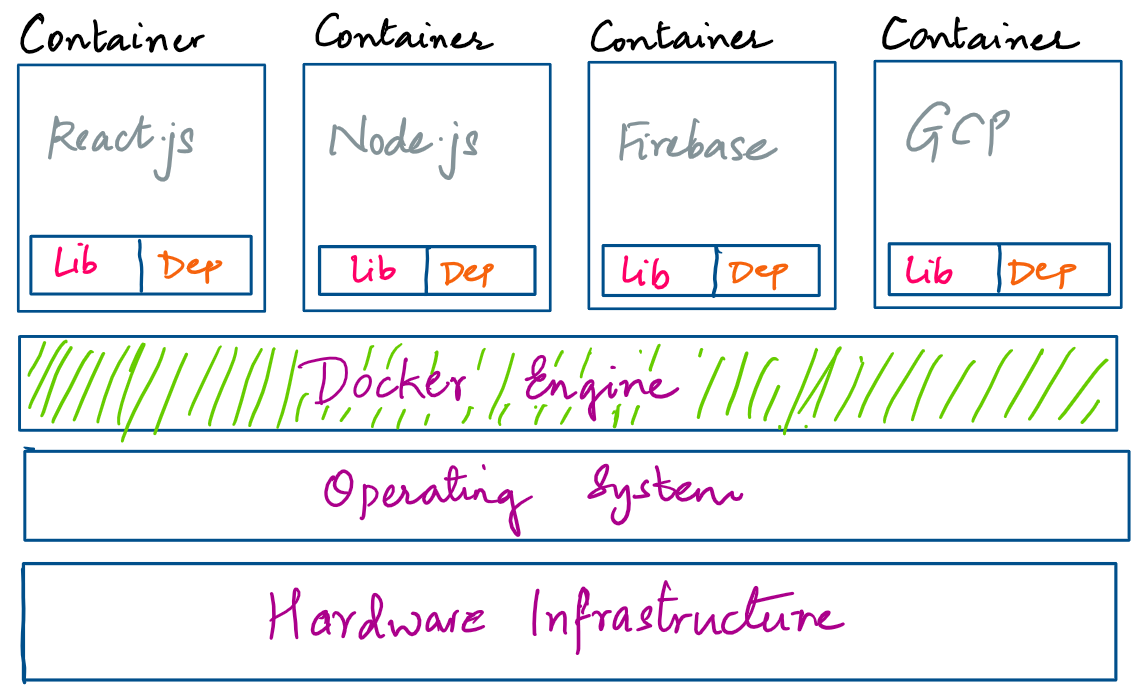
Using Docker, each of the conflicting technologies can be allotted to a separate container that will take care of the dependency/compatibility issues. Later by simply running the docker commands, one need not put much efforts for smooth work as before.
Now let's look at its installation and other setup configurations required:
A. Installation of Docker :
Software requirements: Ubuntu 22.xx
docker [option] [command] [arguments] is the syntax required with variety of options, commands and arguments available.
Read Next: Jenkins installation, setup and exploration of the environment and demonstration of CI/CD.
References:
What is a Docker? A Docker is an application which helps us in the allocation and management of containers in an effective way. The installation of Docker on Linux- distros especially Ubuntu is much convenient than on Windows because of its functionality based on the Linux-kernel. Through this blog we will explore Docker at the beginner level thereby understanding the need of its usage and how it facilitates the automation of CI/CD pipeline.
If the traditional process of developing a software is giving us no issue, then why is there a need of using Docker? Let us consider a scenario where the developers are developing an application which uses the tech-stack that is based on combination of technologies such as React.js, Node.js, Firebase, GCP, etc. Now each of these technologies might require a different environment(dev/test/prod) or library/service compatibility with the operating system. This causes difficulty in proper integration of the software application. This is where using Docker turns out to be beneficial.
Consider the image below:
Using Docker, each of the conflicting technologies can be allotted to a separate container that will take care of the dependency/compatibility issues. Later by simply running the docker commands, one need not put much efforts for smooth work as before.
Now let's look at its installation and other setup configurations required:
A. Installation of Docker :
Software requirements: Ubuntu 22.xx
- At your Terminal, first update the existing packages by running: $ sudo apt update
Now install a few prerequisite packages which let apt use packages over HTTPS: $ sudo apt install apt-transport-https ca-certificates curl software-properties-common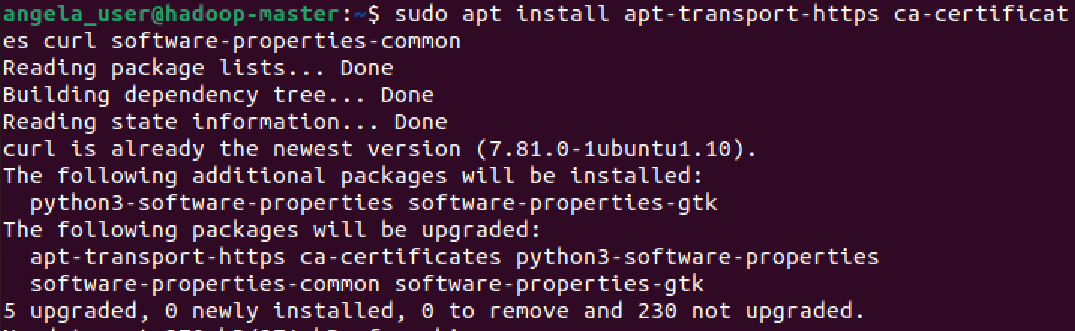
- Then add the GPG key for the official Docker repository to your system:
$ curl -fsSL https://download.docker.com/linux/debian/gpg | apt-key add -
in case this command gives an error saying No OpenPGP found, run the following commands:
$ curl -s https://download.docker.com/linux/ubuntu/gpg | sudo gpg --no-default-keyring --keyring gnupg-ring:/etc/apt/trusted.gpg.d/dockerfile.gpg --import
$ sudo chmod 644 /etc/apt/trusted.gpg.d/dockerfile.gpg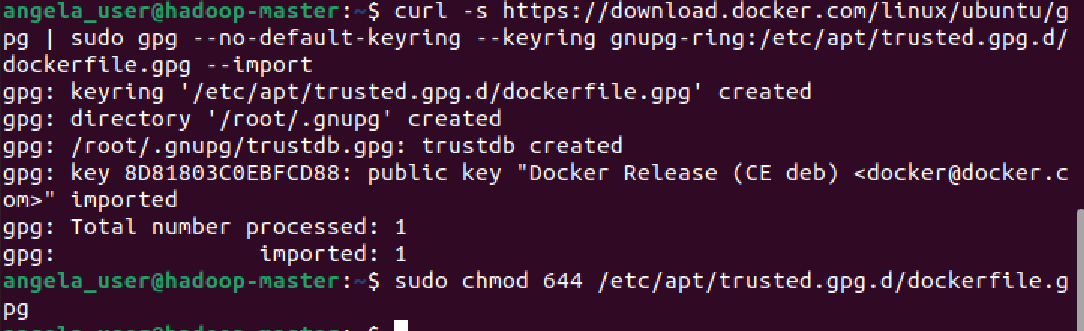
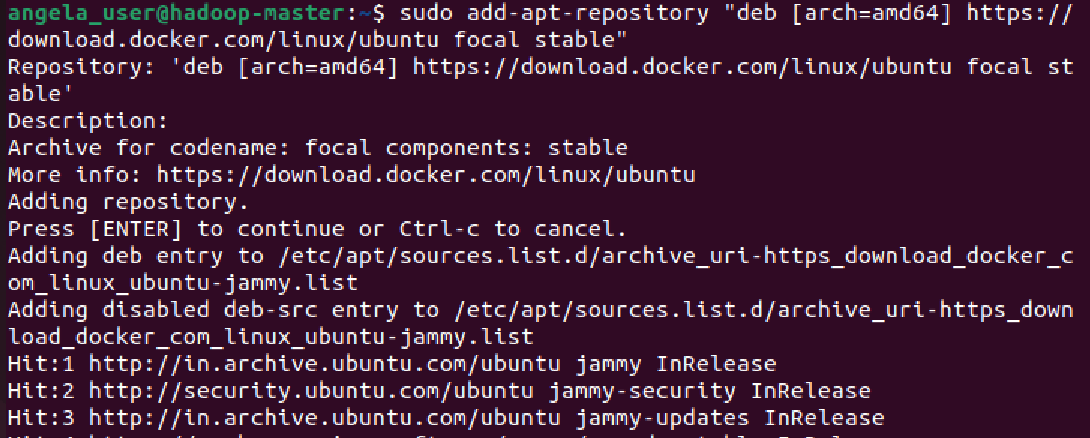
- Add the Docker repository to APT sources: $ sudo add-apt-repository "deb [arch=amd64] https://download.docker.com/linux/ubuntu focal stable"
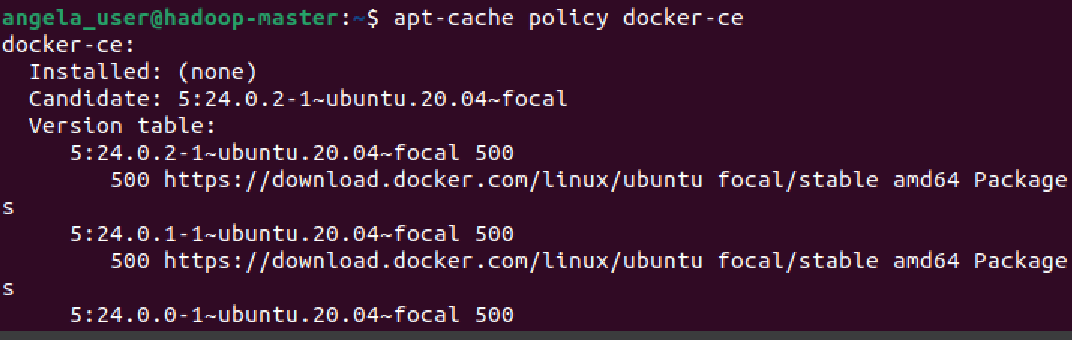
- This will also update our package database with the Docker packages from the newly added repo. Make sure you are about to install from the Docker repo instead of the default Ubuntu repo: Notice that docker-ce is not installed, but the candidate for installation is from the Docker repository for Ubuntu 20.04 (focal). $ apt-cache policy docker-ce
- Now proceed further with Docker installation. Use: $ sudo apt install docker-ce

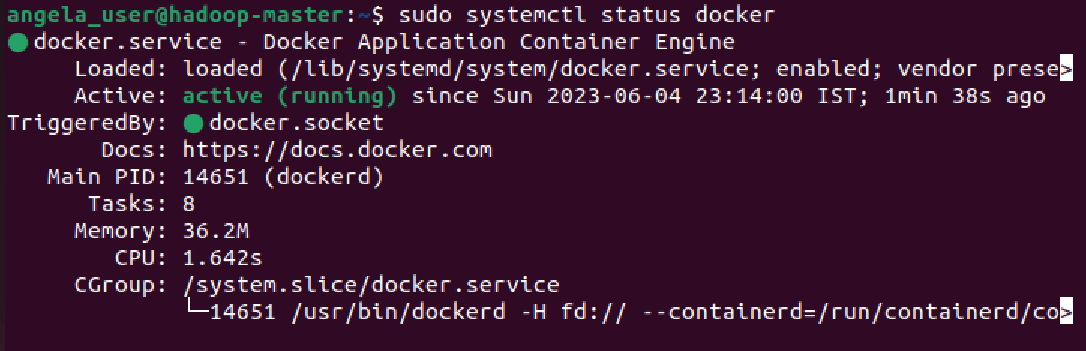
- Once the installation is complete, check the status whether its active (running). $ sudo systemctl status docker
docker [option] [command] [arguments] is the syntax required with variety of options, commands and arguments available.
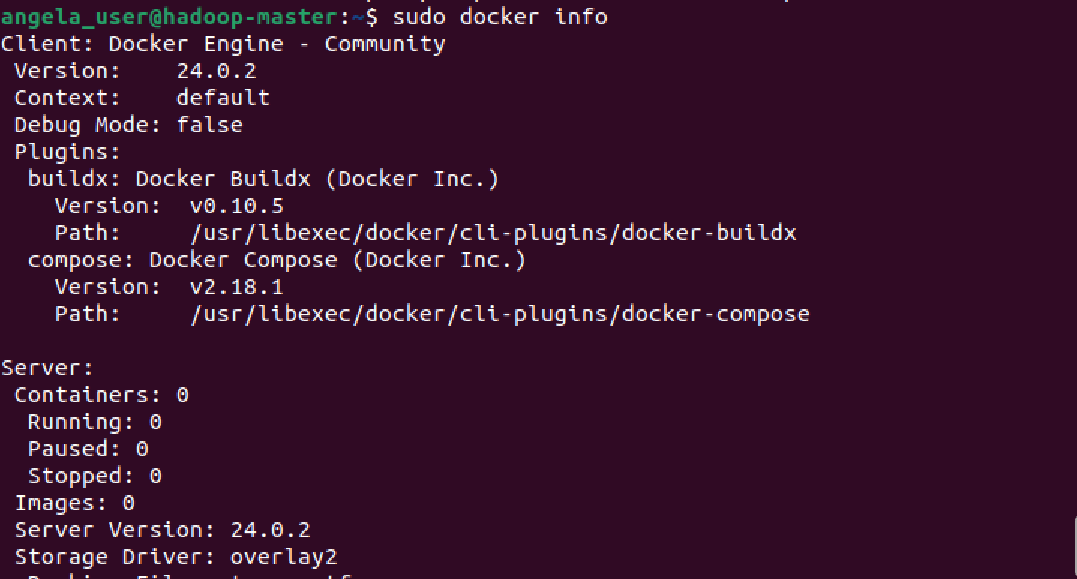
- To begin with, in order to view system-wide information about Docker, use: $ sudo docker info
- Docker downloads images from the Docker-Hub. These are the images from where containers are built. You and me can host our own Docker Images at the hub. One such image is the hello-world image available. Using $ docker run hello-world at your system initially would give you a notification stating unable to find image locally.
After which it proceeds to continue downloading it from the remote repository.

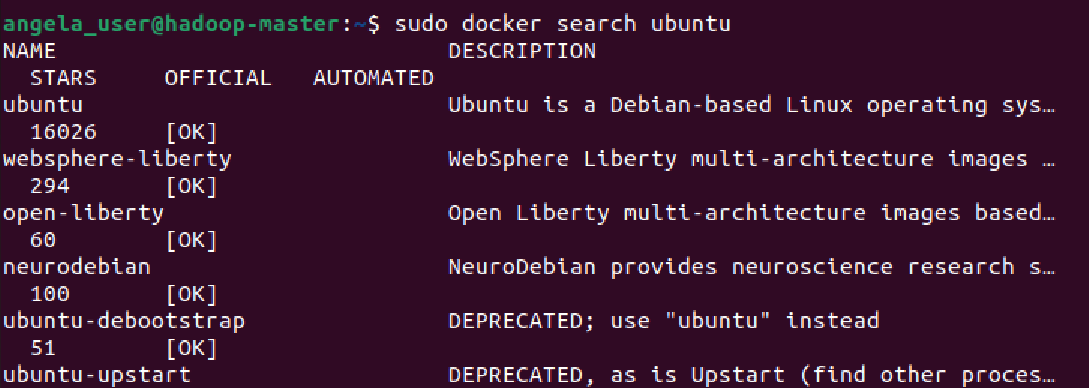
- One can search for other images available at docker using the search parameter. $ sudo docker search [image name] as shown below we are searching for Ubuntu image and that gives us the description, name, stars, and other details about Ubuntu image.
- Next up is the pull command where we can pull a container without running it straight away as seen in the case of hello-world above. $ sudo docker pull [image-name]

- In order to check the images that are present locally at your system use: $ sudo docker images

- Let’s run a container using the latest image of Ubuntu. The combination of the -i and -t switches gives you interactive shell access into the container by using the command - $ sudo docker run -it ubuntu

- Now you will be able to work inside this container if the terminal shows root@[container-id]:/#
Let's proceed with installing nodejs.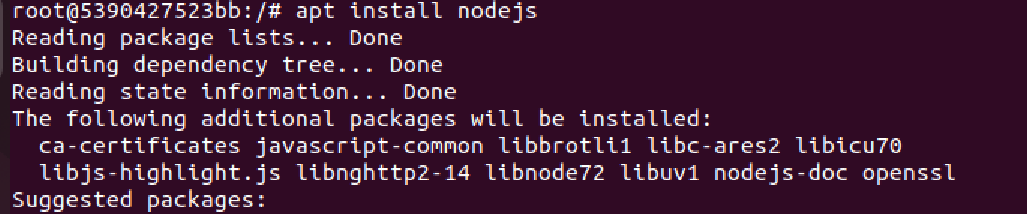
You can now use all the basic cmd commands that we use at our terminal to check the version, update any package, etc.

Type in exit to come out of that container.

- To view the details of those containers that are active type in $ sudo docker ps whereas if you want to view both active as well as inactive containers, add a '-a' tag to it. In order to view the latest container append '-l' tag.

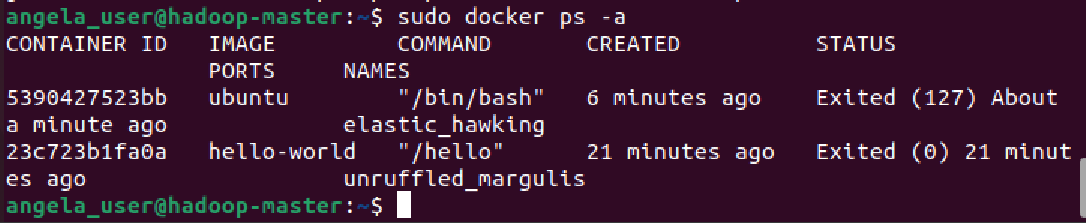

- If you want to re-start a stopped container, use $ sudo docker start [container-id] or [container-name] as shown.

- Here, 'elastic_hawking' is the name for the container-id shown above.
 Note: It is critical to use sudo docker rm [container-id] or [container-name] as all the changes that you have made in the container will be lost forever, which you wont be able to recover it. Unless you are sure of destroying the container, be careful.
- After installing Node.js inside the Ubuntu container, you now have a container running off an image, but this container is different from the image you used to create it. So if you want to reuse this Node.js container as the basis for new images later, commit the changes to a new Docker image instance using the following command-
$ sudo docker commit -m "commit msg" -a "Author Name" container_id repository/new_image_name
Here, commit message is "added node.js"
Author name - 'angela'
Container id - 5390xxxxxxxx
And the container repository/new_image_name - angela/ubuntu-nodejs (the repository is usually your Docker Hub username)

- Listing the Docker images again will show the new image, as well as the old one that it was derived from using- $ sudo docker images

- Let's proceed further to build a simple containerized application. For this lets consider creating a python based app such that we have two files at the root directory :
main.py and Dockerfile.
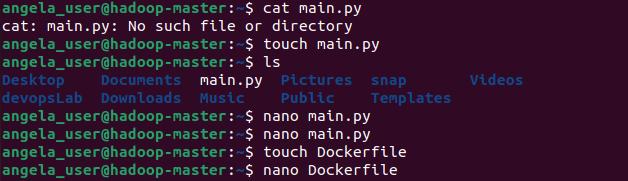
- Let the content of this main.py file be as shown. You can add your python script as convenient.

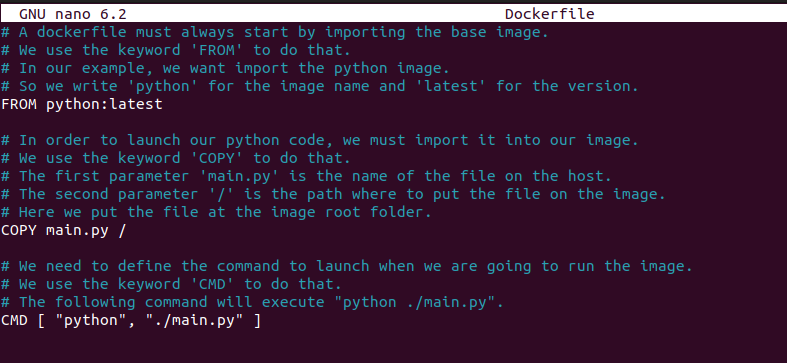
- Similarly, we need content for Dockerfile. In order to run a python file we need compatible dockerfile content. This content can be taken form the official site of Dockerhub by searching for python dockerfile. We have taken the same content as shown below.
- Now build your docker application by giving it any name for e.g. python-ap-test. Run the following command: $ sudo docker build -t python-ap-test .

- If everything builds properly, you will see the exporting layers written with your given file name to the docker library.

- Now run your container. You should see the output of your main.py file. In our case it’s the print statement. It Works!

- Once the script finishes executing the container becomes inactive. This can be checked with the ps -a command

Read Next: Jenkins installation, setup and exploration of the environment and demonstration of CI/CD.
References:
- Python Dockerfile: https://hub.docker.com/_/python